Prepare your Audio interface

1. XLR and 1/4" inputs
These are combination inputs, so you can plug in an XLR jack (commonly used by microphones), or a 1/4" jack (commonly used by instruments)
The inputs can be balanced or unbalanced (click here to read more)
2. Phantom power (+48V) switch
Press this if you are connecting a condenser microphone, because those require 48V phantom power. Condenser microphones are more sensitive and give clearer sound than dynamic microphones, but they are also more fragile.
DO NOT PRESS this if you are plugging in an instrument.
3. Hi-Z Switch
Press this if you are connecting a guitar. This will optimize input impedance and high frequency capture. Without this, guitars may sound dull or muffled.
4. Gain knob
This adjusts the input level of the sound being recorded.
5. Signal or Overload LED
Green = OK
Red = TOO MUCH
6. Monitor knob
Adjusts the volume of the output going to the mixer / speakers.
Always TURN DOWN THE MONITOR before changing any connections, plugging or unplugging.
7. Phones jacks
This is to connect your headphones. If you are using consumer headphones, you will need an adaptor to convert to 1/4" jack.
8. Phones level
DO NOT PLAY TOO LOUD OR YOU WILL GO DEAF. CAN YOU HEAR ME.
9. Direct Monitor Switch
Switch this on if you want to hear the recorded sound directly from the inputs to the headphones. If you don't switch this on, the recorded sound travels into the DAW/computer and back out again to the headphones, which will cause several milliseconds of delay (latency), which can give you a weird feeling of losing timing.
10. Mix knob
With switch 9 in mind,
- full left = you only hear the inputs, no DAW
- centre = you hear both
- full right = you only hear the DAW, no inputs
11. USB indicator
If this is on, the audio interface is being powered by the computer. If you don't see it, it's not working.
12. MIDI indicator
This indicates if the interface is receiving MIDI signals, which would happen if you connect a MIDI instrument (e.g. a keyboard) to the interface
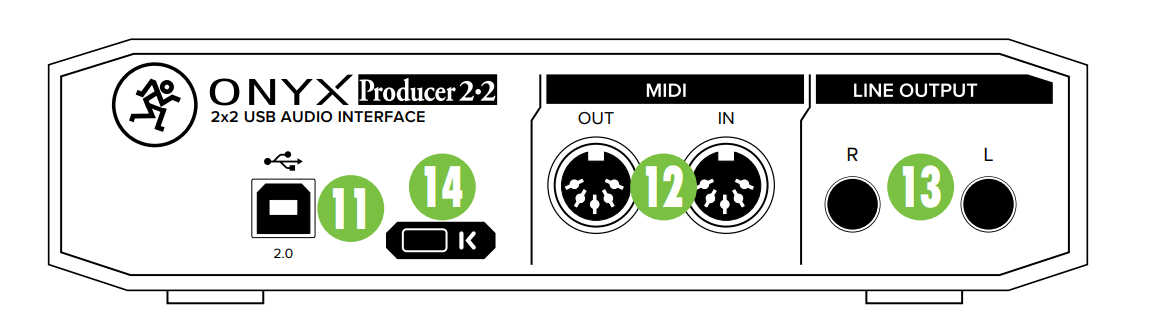
Back panel
Record an instrument or voice
Arm for recording

Start Recording

Recording with Count-in

Recording and Comping takes (a bit more advanced)
Recording different takes
- While recording new clips in the Arrangement View take lanes are automatically added to armed audio tracks.
- Recording over existing clips, either by recording individual passes or by recording in a loop (see ‘The Arrangement Loop’), will add a new take lane for each pass.
- Existing take lanes will be automatically reused when no other clip exists after the punch-in point.
- The last recorded clip in a track is always copied to that track’s main lane, so that it becomes immediately audible when playing back the Set.

Auditioning Take Lanes

Comping (combining the best part of) Takes

Comments
Post a Comment